
1.3インチOLEDとロータリーエンコーダーが付いた基板をESP32で動かしてみた。
より良い操作系を探していて、今回、1.3インチのOLEDとロータリーエンコーダーが乗った基板があったので試してみた。特に問題なく動いたし、操作系もいいのでこれはありかなと思った。今回使ったESPモジュールは、0.96インチのOLEDのついたESP32Dのボード。OLED付きのやつで、技適になっているものが少ないので、付いているものを探して購入し直した。
Oled-wifiモジュール,bluetooth ESP-32 ESP-32S,esp8266,oled esp32 oled – AliExpress 502
白いOLEDディスプレイ画面,ec11ロータリーエンコーダーモジュール,arduino用iicインターフェイス,0.96インチ,1.3インチ – AliExpress 502
0.96のESP32もロータリーエンコーダーもSPECを出してくれないので、プログラミングに困った。ESP32は、HW-724をたどると、Wemos Lolin32であることが分かった。
これはAutoFlash機能が使えないので、プログラムのたびにSW操作が必要で面倒だ。またI2CのGPIOが標準の21,22でないので動かなかった。
SDA GPIO 5
SCL GPIO 4
OLED I2Cアドレス 0x3C
だった。これくらいの情報は出してほしいだけど、まあ安いので仕方ないか。まあ、ESP32Dなんで技適付きなのでWIFIが使えるのが良い。
また、ロータリーエンコーダーのOLEDのI2Cアドレスも、0x3cだった。これだと、I2Cのアドレスが重なってしまうので、EPS32Dは2つのI2Cがあるので、個別にI2Cを動かすことにした。
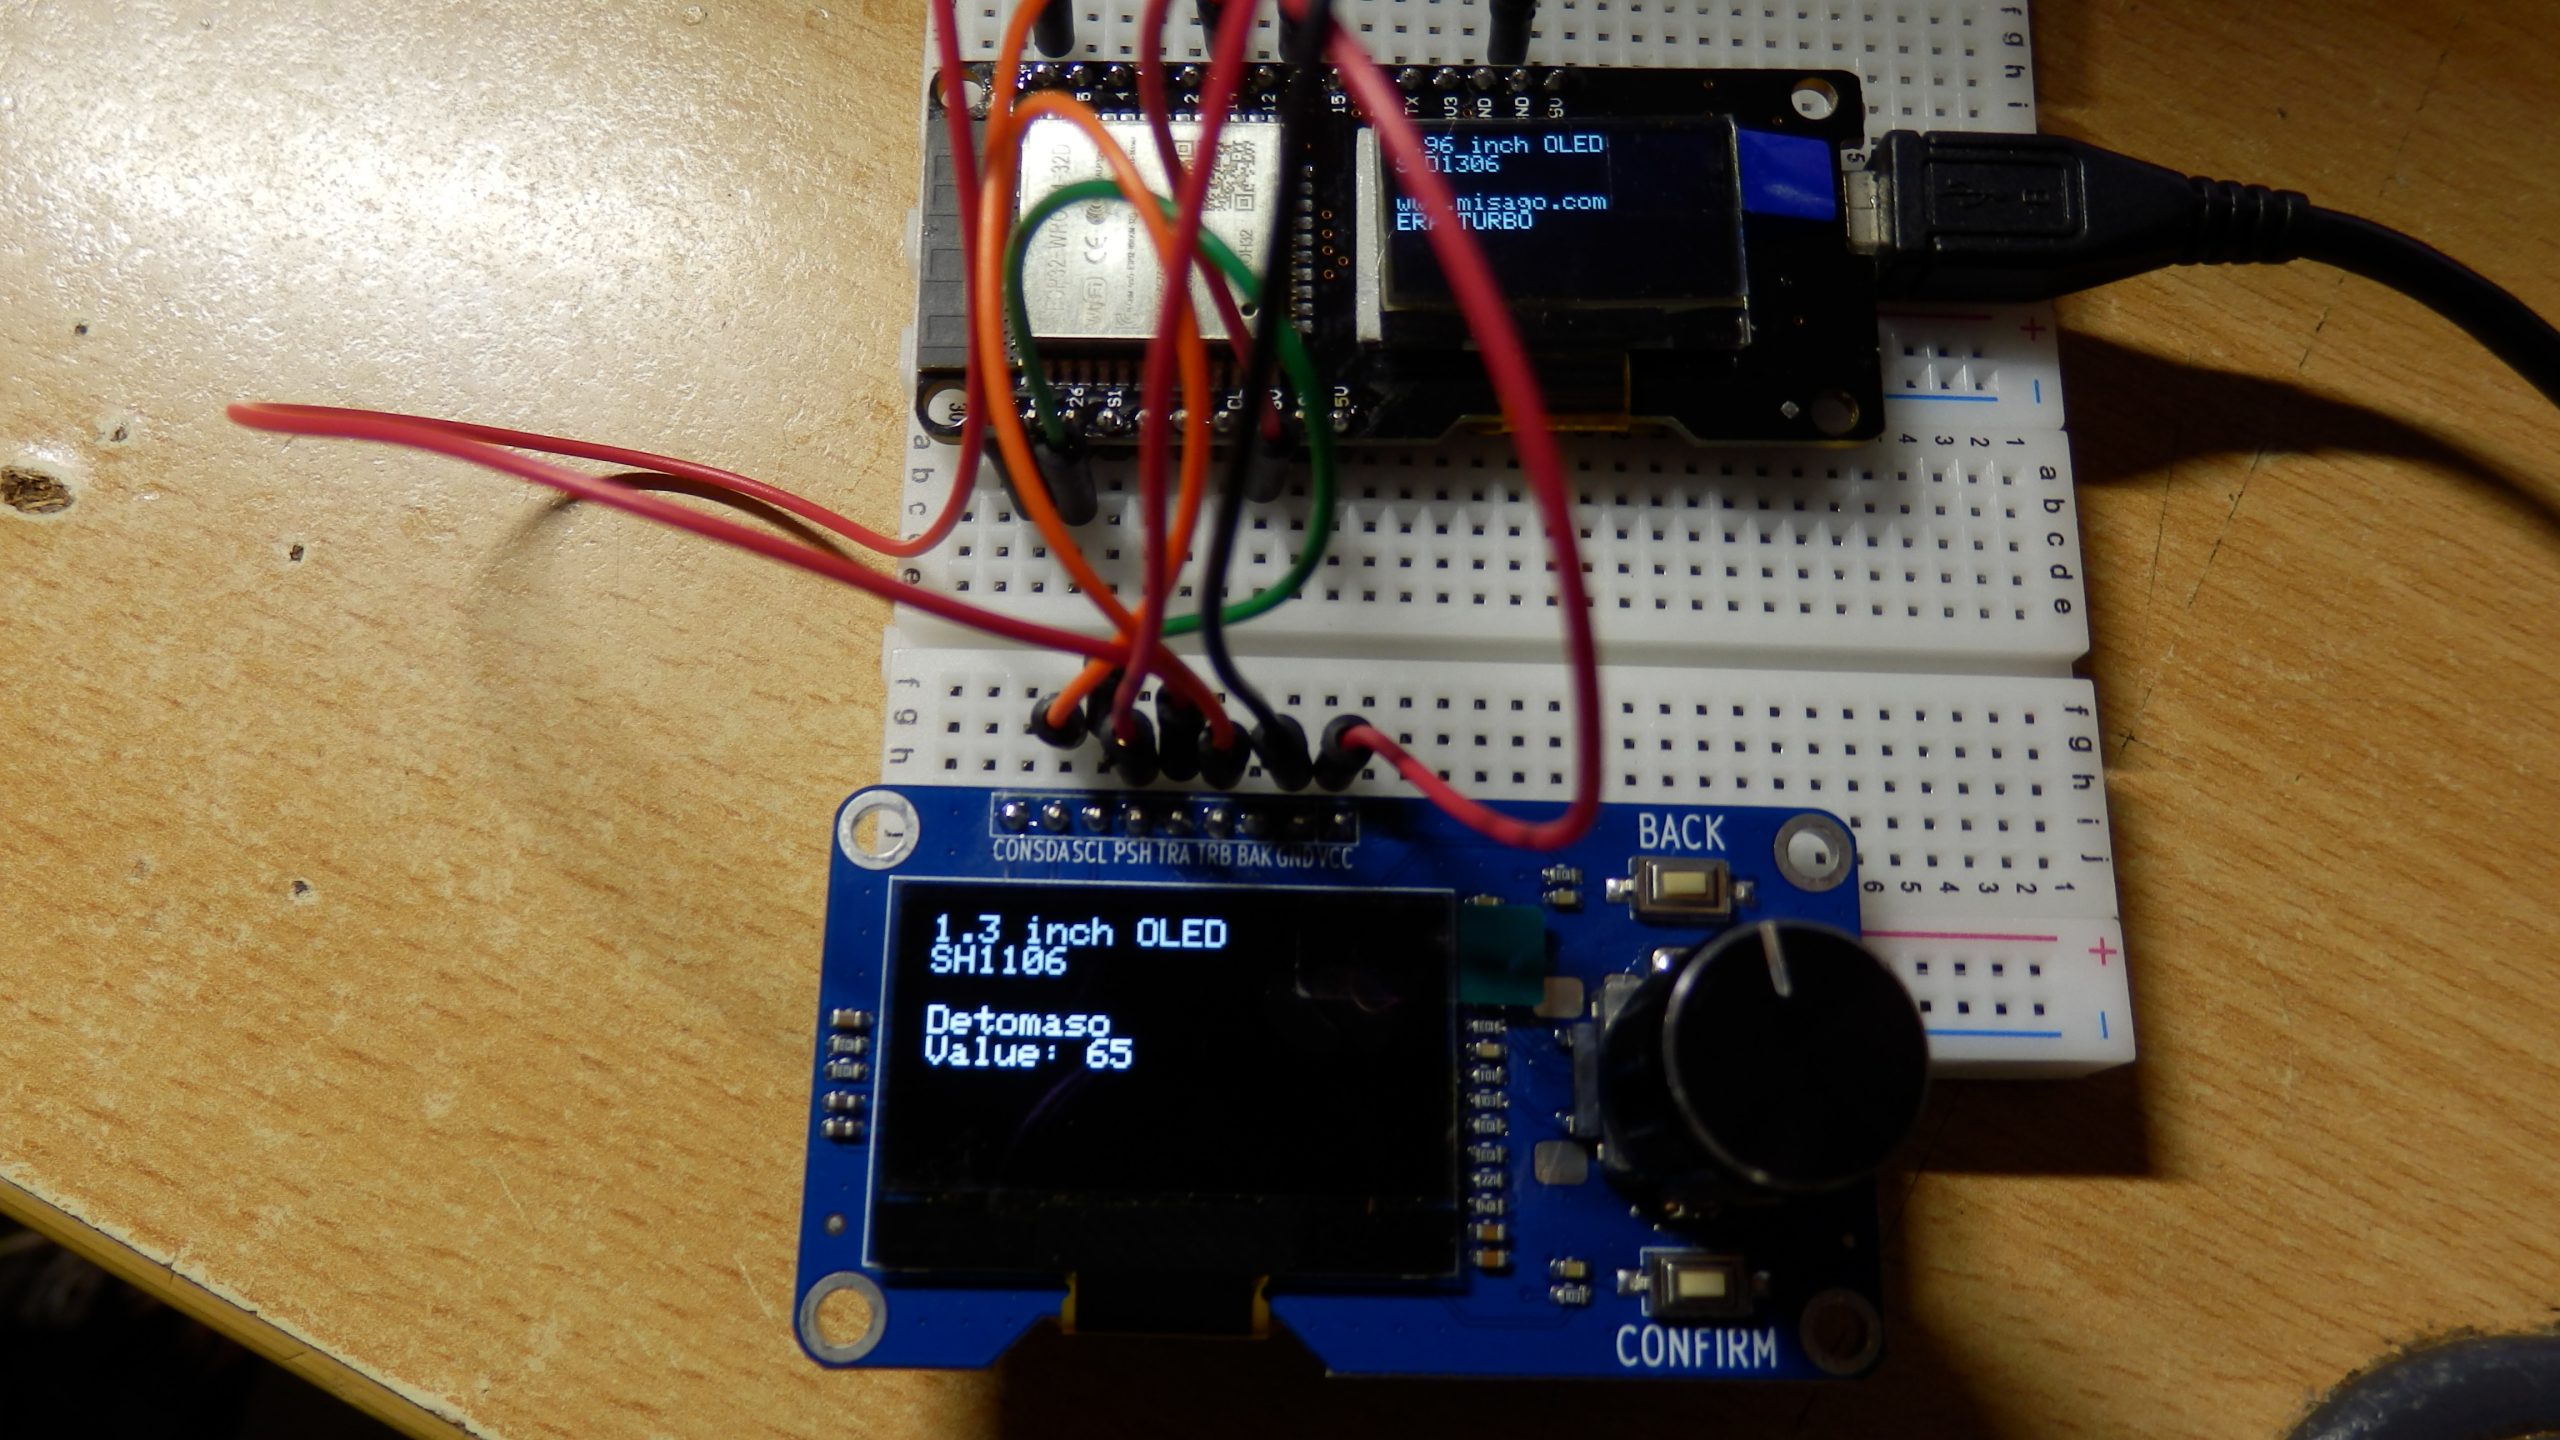
1.3インチのOLEDとロータリーエンコーダのボードがあったので、動作確認してみた。
ちょっと感覚が違うのは、反時計回りでカウントアップだったのがはまった要因。だけど、それ以外は意外に簡単に動作できた。
今回確認に使った、スケッチは下記の通り、
/*
* ESP32 + 0.96インチOLED(SSD1306)と1.3インチOLED(SH1106) に表示する
*
* ボード:Wemos Lolin32
* 2024-10-24
*
* 0.96インチOLED: I2Cアドレス=0x3C, SSD1306ライブラリ
* 1.3インチOLED: I2Cアドレス=0x3C, SH1106ライブラリ
*/
#include <Wire.h> // I2C ライブラリ
#include <Adafruit_GFX.h> // グラフィックのコア・ライブラリ
#include <Adafruit_SSD1306.h> // 0.96インチ OLED
#include <Adafruit_SH110X.h> // 1.3インチ OLED
#include "AiEsp32RotaryEncoder.h"

#define OLED_I2C_ADRS 0x3C // I2C address of OLED
#define Wire_SDA 5
#define Wire_SCL 4
#define Wire1_SDA 25
#define Wire1_SCL 26

Adafruit_SSD1306 OLED(128, 64, &Wire, -1);
Adafruit_SH1106G OLED1(128, 64, &Wire1, -1);

// 引数 WIDTH, HEIGHT, &Wire, OLED_RESET
// 4つ目の引数はRESETピン -1はArduinoのRESETピンと共有

int rolayvalue=0;
int keystatus=false;
/*
connecting Rotary encoder

Rotary encoder side MICROCONTROLLER side
------------------- ---------------------------------------------------------------------
CLK (A pin) any microcontroler intput pin with interrupt -> in this example pin 16
DT (B pin) any microcontroler intput pin with interrupt -> in this example pin 14
SW (button pin) any microcontroler intput pin with interrupt -> in this example pin 13
GND - to microcontroler GND
VCC microcontroler VCC (then set ROTARY_ENCODER_VCC_PIN -1)

***OR in case VCC pin is not free you can cheat and connect:***
VCC any microcontroler output pin - but set also ROTARY_ENCODER_VCC_PIN 25
in this example pin 25

*/
#if defined(ESP8266)
#define ROTARY_ENCODER_A_PIN D6
#define ROTARY_ENCODER_B_PIN D5
#define ROTARY_ENCODER_BUTTON_PIN D7
#else
#define ROTARY_ENCODER_A_PIN 16
#define ROTARY_ENCODER_B_PIN 14
#define ROTARY_ENCODER_BUTTON_PIN 13
#endif
#define ROTARY_ENCODER_VCC_PIN -1 /* 27 put -1 of Rotary encoder Vcc is connected directly to 3,3V; else you can use declared output pin for powering rotary encoder */

//depending on your encoder - try 1,2 or 4 to get expected behaviour
//#define ROTARY_ENCODER_STEPS 1
//#define ROTARY_ENCODER_STEPS 2
#define ROTARY_ENCODER_STEPS 4

//instead of changing here, rather change numbers above
AiEsp32RotaryEncoder rotaryEncoder = AiEsp32RotaryEncoder(ROTARY_ENCODER_A_PIN, ROTARY_ENCODER_B_PIN, ROTARY_ENCODER_BUTTON_PIN, ROTARY_ENCODER_VCC_PIN, ROTARY_ENCODER_STEPS);

//--------------------------------------------------------------------------
void IRAM_ATTR readEncoderISR()
{
rotaryEncoder.readEncoder_ISR();
}

void setup() {

// OLED Setuo
Wire.begin(Wire_SDA, Wire_SCL);
Wire1.begin(Wire1_SDA, Wire1_SCL);
//we must initialize rotary encoder
rotaryEncoder.begin();
rotaryEncoder.setup(readEncoderISR);
Serial.begin(115200);

delay(250); // wait for the OLED to power up

// SSD1306_SWITCHCAPVCC :表示用電圧を3.3Vから生成する
if(!OLED.begin(SSD1306_SWITCHCAPVCC, OLED_I2C_ADRS)) {
Serial.println(F("SSD1306 allocation failed"));
for(;;); // Don't proceed, loop forever
}
if(!OLED1.begin(OLED_I2C_ADRS, true)) {
Serial.println(F("SH1106 OLED allocation failed"));
for(;;); // Don't proceed, loop forever
}
// OLEDに初期表示バッファの内容を表示する
// ライブラリはこれをAdafruitスプラッシュ画面で初期化する
OLED.display();
OLED1.display();
delay(2000); // 2秒待つ
OLED.clearDisplay();
OLED1.clearDisplay();
OLED.display();
OLED1.display();
OLED.setTextSize(1); // フォントサイズを1~で指定
OLED1.setTextSize(1); // フォントサイズを1~で指定
OLED.setTextColor(SH110X_WHITE); // フォント色
OLED1.setTextColor(SH110X_WHITE); // フォント色

//set boundaries and if values should cycle or not
//in this example we will set possible values between 0 and 1000;
bool circleValues = false;
rotaryEncoder.setBoundaries(0, 1000, circleValues); //minValue, maxValue, circleValues true|false (when max go to min and vice versa)

/*Rotary acceleration introduced 25.2.2021.
* in case range to select is huge, for example - select a value between 0 and 1000 and we want 785
* without accelerateion you need long time to get to that number
* Using acceleration, faster you turn, faster will the value raise.
* For fine tuning slow down.
*/
//rotaryEncoder.disableAcceleration(); //acceleration is now enabled by default - disable if you dont need it
rotaryEncoder.setAcceleration(250); //or set the value - larger number = more accelearation; 0 or 1 means disabled acceleration
}

void rotary_onButtonClick()
{
static unsigned long lastTimePressed = 0;
//ignore multiple press in that time milliseconds
if (millis() - lastTimePressed < 500)
{
return;
}
lastTimePressed = millis();
if (keystatus == true){
keystatus = false;
}else{
keystatus=true;
}
}

void rotary_loop()
{
//dont print anything unless value changed
if (rotaryEncoder.encoderChanged())
{
rolayvalue=rotaryEncoder.readEncoder();
}
if (rotaryEncoder.isEncoderButtonClicked())
{
rotary_onButtonClick();
}
}

void loop() {

rotary_loop();

OLED.setCursor(0,0);
OLED1.setCursor(0,0);
OLED.clearDisplay();
OLED1.clearDisplay();

OLED.println("0.96 inch OLED");
OLED.println("SSD1306");
OLED.println("");
OLED.print("www.misago.com ");
OLED.print("ERA TURBO");
OLED.display();

OLED1.println("1.3 inch OLED");
OLED1.println("SH1106");
OLED1.println("");
OLED1.println("Detomaso");
OLED1.print("Value: ");
OLED1.println(rolayvalue);
if ( keystatus == true ){
OLED1.println("Push button");
}else{
OLED1.println(" ");
}
OLED1.display();

delay(50);
}


の修理-脱水からすすぎへ戻ってしまうトラブルを直した")
最近のコメント